Overview
This guide outlines the necessary steps for shipping items domestically, ensuring that shipments are properly insured, prepared, and processed in compliance with UC San Diego's guidelines. This KBA is for requesting Mailing and Shipping Services with pickup from the Outbound Shipping Team.
Essential Information
This guide ensures that all steps of the shipping process are followed efficiently and in accordance with UC San Diego's guidelines. There are three ways to ship domestic, non-hazardous packages:
- Pickup through Campus Mail: If you have an active Mail Code, you may leave your Outbound USPS for the Campus Mail Department to pick up at your designated Mail Stop. If you have any questions of where your Mail Stop is, please reach out to Campus Mail via Services and Support.
- Schedule driver pickup: Fill out a Logistics Request Form.
- Ship packages yourself with ShipIt: Domestic, non-hazardous shipments may also be conducted independently with our desktop application ShipIt.
NOTE: You may order free carrier-branded shipping supplies, delivered to your Mail Code, on the Logistics Portal.
Next Steps
Shipping Non-Hazardous, Domestic mailings with USPS
If you have an active Mail Code, you may leave your Outbound USPS for the Campus Mail Department to pick up at your designated Mail Stop. If you have any questions of where your Mail Stop is, please reach out to Campus Mail via Services and Support.
With the introduction of a new chart of accounts, Logistics is encouraging barcoding as a way to capture recharge information for outgoing mail. The account structure consists of three account fields, and barcoding provides a reliable, accurate and cost-effective means of capturing data.
There are two ways to barcode recharge numbers for outgoing mail:
- Print a sheet of barcode labels to apply to individual letters
- Open the Metered Mail Barcode Form using your SSO
- Select “Label Sheet - Avery 1/2" x 1-3/4" Blank Rectangle Labels” and enter your Project Number, Task Number and Funding Source (optional).
- Submit the request and print out the Barcode PDF on the Avery labels.
- Place the barcodes on your letters in the following placement:
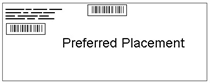
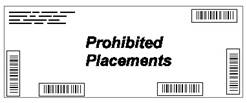
Barcodes SHOULD NOT be placed here per USPS:
NOTE: The barcode request can be submitted for each unique POETAF combination and reprinted at any time by viewing your profile/history within the Logistics Portal.
- Bundle mail by recharge number using a barcoded facing sheet
- Open the Metered Mail Barcode Form using your SSO
- Select “Label Page for Metered Mail Bundle” and enter your Project Number, Task Number and Funding Source (optional).
- Submit the request and print out the Barcode PDF.
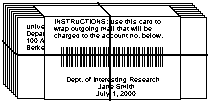
Bundle your metered mail by recharge string like this:
NOTE: The barcode request can be submitted for each unique POETAF combination and reprinted at any time by viewing your profile/history within the Logistics Portal.
Address format
The USPS recommends the following address format on all mail to U.S. destinations:
- Name or attention line
- Company
- Suite or apartment number
- Delivery address
- City, state, ZIP code
Sample:
|
JANE L MILLER |
Additional address guidelines from the USPS:
- Use all capital letters, at least 10-point type, and simple fonts.
- Don't use commas or periods.
- Don't place any information below the city, state, and ZIP code line, including a logo, a slogan, or an attention line.
- Use black ink on white or light paper.
- Don't use reverse type (white printing on a black background).
- Include all important information when using address labels.
- Use address windows with at least 1/8-inch clearance around the address.
- Use one space between city and state, and two spaces between state and ZIP code.
NOTE: Mail processing machines have trouble reading crooked or slanted information. Be sure your labels are straight.
Shipping Non-Hazardous, Domestic mailings with FedEx, UPS, or other carriers
How to schedule a direct pickup through the Logistics Portal.
Step 1: Obtain Insurance
It is important to insure your shipment to ensure its safety during transit. To determine your specific insurance needs, refer to Transit Insurance.
- Approval: Receive required approval before moving to the next step.
- Insurance Queries: For questions regarding insurance, contact:
- Email: ehsrisk@ucsd.edu
- Phone: (858) 534-2454
Step 2: Prepare Your Package
Ensure that each item is securely packaged for shipment. If your shipment consists of multiple packages, follow these instructions:
- Labeling: Mark each package with running-total numbers (e.g., "1 of 3," "2 of 3").
- Shipping Form: List each package number on the Shipping Form and include a description of the contents for each package.
The following materials may be considered hazardous. If your shipment contains any of the following, please follow specific guidelines:
- Biological Material
- Research Material
- Temperature Sensitive Material
- Batteries
For Hazardous Materials, please ensure that you follow all appropriate safety and regulatory guidelines for Hazardous Shipping.
NOTE: Request forms submitted before 3pm for non-hazardous, domestic packages will be picked up the following business day. Once the package is shipped, you will receive an automated email with the tracking number.
Step 4: Handover the Package
Once your package is prepared and the request form is submitted, hand over the package to the driver. The driver will collect your shipment and deliver it to the Outbound Shipping Team.
NOTE: For liability reasons, drivers can only pick up shipments that have an approved pickup request form.
Questions?
If you need any additional assistance or have questions regarding a specific carrier, please Submit a Ticket